Showing posts with label underground. Show all posts

Dec 29, 2014

The Bunker

A few days past Christmas festivities, we are happy to show you the latest advancements downstairs. You may remember the original Man Cave Pekka build two years ago in the small room located next to the bathroom. This room is now serving mostly a storage space and will soon be converted to a guest room, thus meaning that the "Man Cave" functionalities will finally relocate underground, more specifically to the bunker.


Step in and have a peak!

The original table and shelves from the Man Cave have already been reinstalled to the new location and Pekka and has started to build a suspended ceiling. According to our thinking, this seemingly "unnecessary" structure will be important element creating a more "room-like" feel for the Man Cave, rather than the space being just a cellar (as it actually, in reality is). It is all about the details, isn't it?

The first phase of the installation

Similarly to the laundry room, also the bunker has fluorescent tube lighting. What is different between the two is that the main part of the bunker lighting will be hidden behind the ceiling slats.

Hidden fluorescent tube housings

Placing the fluorescent tubes above the ceiling hides the light sources and makes the light penetrate through the slats. On the way down the light picks up a warm wooden tone and creates a cozy, inviting atmosphere.

Light shining through the slats

The bunker will have two separate lighting modes that can also be turned on simultaneously. The first switches on the fluorescent tubes above the ceiling. The second operates the work lights above the table similarly to Pekka's set up in the original Man Cave.

General vs. working lights 


General vs. working lighting 

During a recent visit and the semi-mandatory tour around the apartment, Pekka's aunt wondered if Pekka is having a "slat-period" in his life. Yes, he has indeed built a suspended ceiling in the laundry room using a similar approach and yes, also the downstairs teak wall is made of slats. But rather than Pekka's personal obsession, the rationale revolves more around the warmth and scandinavian look of the structure. So when the decision needed to be made regarding the bunker ceiling, we didn't think two minutes of not adding this mid century twist to the overall slat mix.

Getting there...!

As of today, Pekka has installed about 15 square meters of ceiling. Once again, we quite like how it is materializing.  Over the Holiday break he will continue the project and once there are further concrete results, we will of course post an update for you to review.

Aug 3, 2014

Creating storage space

This summer has been sunny and hot. Perfect time to spend in a cool bunker!

Now, with the bunker concrete floor being sanded and painted and the granite washed and protected, one of the projects we really wanted to complete during this summer was to build a shelf system in the bunker. We are desperate to get organised as the original storage room was knocked down during the downstairs demoliton and also the garage remains full of boxes since we moved in two years ago.

As the floor space in the bunker is limited, we preferred to build the shelves on top of the uneven granite to utilise the space as effectively as possible.

Defining the position of the supporting structure

First set of shelves up


The shelf system was not only optimised to complement the form of the granite, but also to fit a maximum number of Smart Store plastic boxes. We had chosen three sizes, and the shelves would host 14 large, 28 medium and 12 small boxes in total.


Following the form of the granite


And they fit perfectly!

When building on an uneven surface, the preferred way is to start from the top. Pekka had an idea of using threaded rods to form a supportive structure, which was attached in to the ceiling with concrete anchors. Further, it was adjusted to hold each shelf in the correct position with a nut on each side. This way, the supporting structure would take a very little space and help to maximise the shelf space.


Supportive structure

Hanging down from the ceiling


Once again, one of the essentials the project would have not succeeded without was the laser attached to an adjustable camera stand.


Hama stand proving itself a must-have

It took three days to build the entire system, but we really consider the time, sweat and sunny days wasted worth it. Sofi also found climbing the granite quite exciting, and was not an unusual sight visiting the bunker wearing her pink earmuffs.

Pekka at work

Rock climbling


And, finally it was ready! In the corner, we left a space for an extra freezer, and there will be some additional storage solutions added in the bunker, but the biggest and most laborious part is now done. We actually think that given it is a storage shelf located in the basement, the system has an interesting, elegant look and feel to it!


Ready for boxes


Jun 28, 2014

Major milestone reached

The time we have been slaving to finish the bunker really seems like a small eternity.  Since last September, more than 30 tons of junk has been manually wheeled out, and close to 10 tons of gravel has been carried in. Considering all the renovation projects we have ever been involved in, the bunker clearly ranks as the most demanding one.

So finally, after ten months the big day had finally arrived. It was almost touching to see the concrete pump truck slowly turning to the backyard alley.

Truck-mounted concrete pump arrives

Of course, we had the option of casting the 17 square meters concrete slab ourselves. But having to acquire the know how, rent the equipment, carry hundreds of sacks of cement and investing all the time that would have been required, it was simply not a viable option. Additionally, the offer we received from the concrete company was very reasonable, which of course made the decision making even easier.

Pulling out the hoses

The preferred option was indeed to enter from the backyard. To achieve the bunker, close to 50 meters of hose was needed. However, the alleyway leading to the backyard had been softened by heavy rain this summer. So would the heavy trucks be able to climb up the slippery grass slope was the biggest question mark of the entire project.

The Plan B was to enter from the front of the apartment and approach through the upper floor, via the staircase all the way downstairs. However the idea of pulling a filthy hose through our home was not the most appealing one.

50 meters of hose

Once the set up was ready, the concrete truck arrived.

Concrete approaching

This time, it was not so easy. Whereas the lighter pump truck managed to climb up the slope, the soft and slippery grass was a huge challenge for the much heavier concrete truck. More than ten times the driver tried to desperately climb up the slope, but every time the tires started to slip on the grass.

The situation was critical. There is a certain time limit when the concrete has to be poured in as it naturally will start solidifying very soon. Of course we could choose Plan B and enter from the front, but it would have meant disassembling and reassembling all the hoses, and also protecting the upper floor from splashes. Clearly, quick decisions were needed.

Our neighbours must love us!
Finally after fifteen minutes, taking a slight side track helped and the heavy truck managed to slowly climb up the hill. Needles to say the sense of relief was enormous. Just like in life in general, also in renovation a bit of luck is a necessity!

Approaching


Perfect match

Of course, Urho's tasks was once again to manage the project - but from the the upper floor. A small dog, big machines and a strict time limit is far from a good combination, so his remote positioning was chosen only for Urho's own good.

The general manager

The feeling of finally seeing the concrete covering the prepared floor was unbeliveable. The guy responsible of pouring had a remote control unit attached to his belt and by pressing a button he was able to control the concrete pump.


Vesa pouring the concrete


Touch down!

Again, a laser was used to level everything with the mark defined by Pekka earlier.


Leveling with a laser

Whereas the first guy was responsible for pouring the concrete and roughly levelling it, the second one was working his way out from the bunker and ensuring the predetermined level was reach everywhere.

Manual levelling

It was great to watch the professionals at work. To gain a perfect end result this job clearly requires true craftsmanship combined with solid experience.


Cratfmanship in action

The last thing to do was to cover the concrete to prevent it from drying too fast. This can be done either by using a plastic sheet or spraying a protective layer on top. We chose the latter, as the spraying was easy to do after manual levelling.

Now, all we can do is to sit and wait. For us, this is a major milestone. Both physically and psychologically. Almost a reason enough to open a bottle of wine and celebrate (which, actually, has also already been done...)!

Future floor


Jun 27, 2014

Preparing for concrete

Preparing foundation for a concrete floor seems simple and straightforward. And in a way, it is. But if you do it yourself, for a first time, over evenings and weekends after work, some thinking and perseverance is required to get it right.

So here is what we did in the bunker. First, the bed of gravel had to be compacted as much as possible. The easiest way was to rent a plate compactor.

Plate compactor

To determine all gravel was equally levelled, we used a laser. So handy that it makes you wonder - how was something like this done before the time of these miraculous pieces of equipment?


Levelling with a laser

You also need to leave a small space between the wall and concrete floor. To accomplish this, some hot-setting adhesive and foamed plastic were used.

Rolling out space to be

Next, the insulation layer made of 50 mm thick expanded polystyrene sheets was fitted in place.


Last look at the gravel!

Of course given the irregular shape of the space, there was a lot of detailing to do. Once again, hot-setting adhesive was very useful.


Glue Master at work

Sofi also seized the sudden opportunity. It is not very often when colouring the floor is allowed. And it probably shouldn't have been allowed now either, given the guidance regarding consistency in raising kids. But it was just so much fun!


Guess what is my favourite colour?

On top of the insulation Pekka unrolled a layer of separation fabric, which was finally followed by a reinforcing steel wire lifted up a few centimetres with plastic holders. This was to ensure the positioning of the reinforcing wire in the middle of the concrete slab.

Wired

Holding up

The last thing to do was to protect the walls from any potential splashes of concrete. Now, fingers crossed all goes well with the concrete delivery and we soon have a floor underground!

Ready for some concrete action

May 30, 2014

Electrified

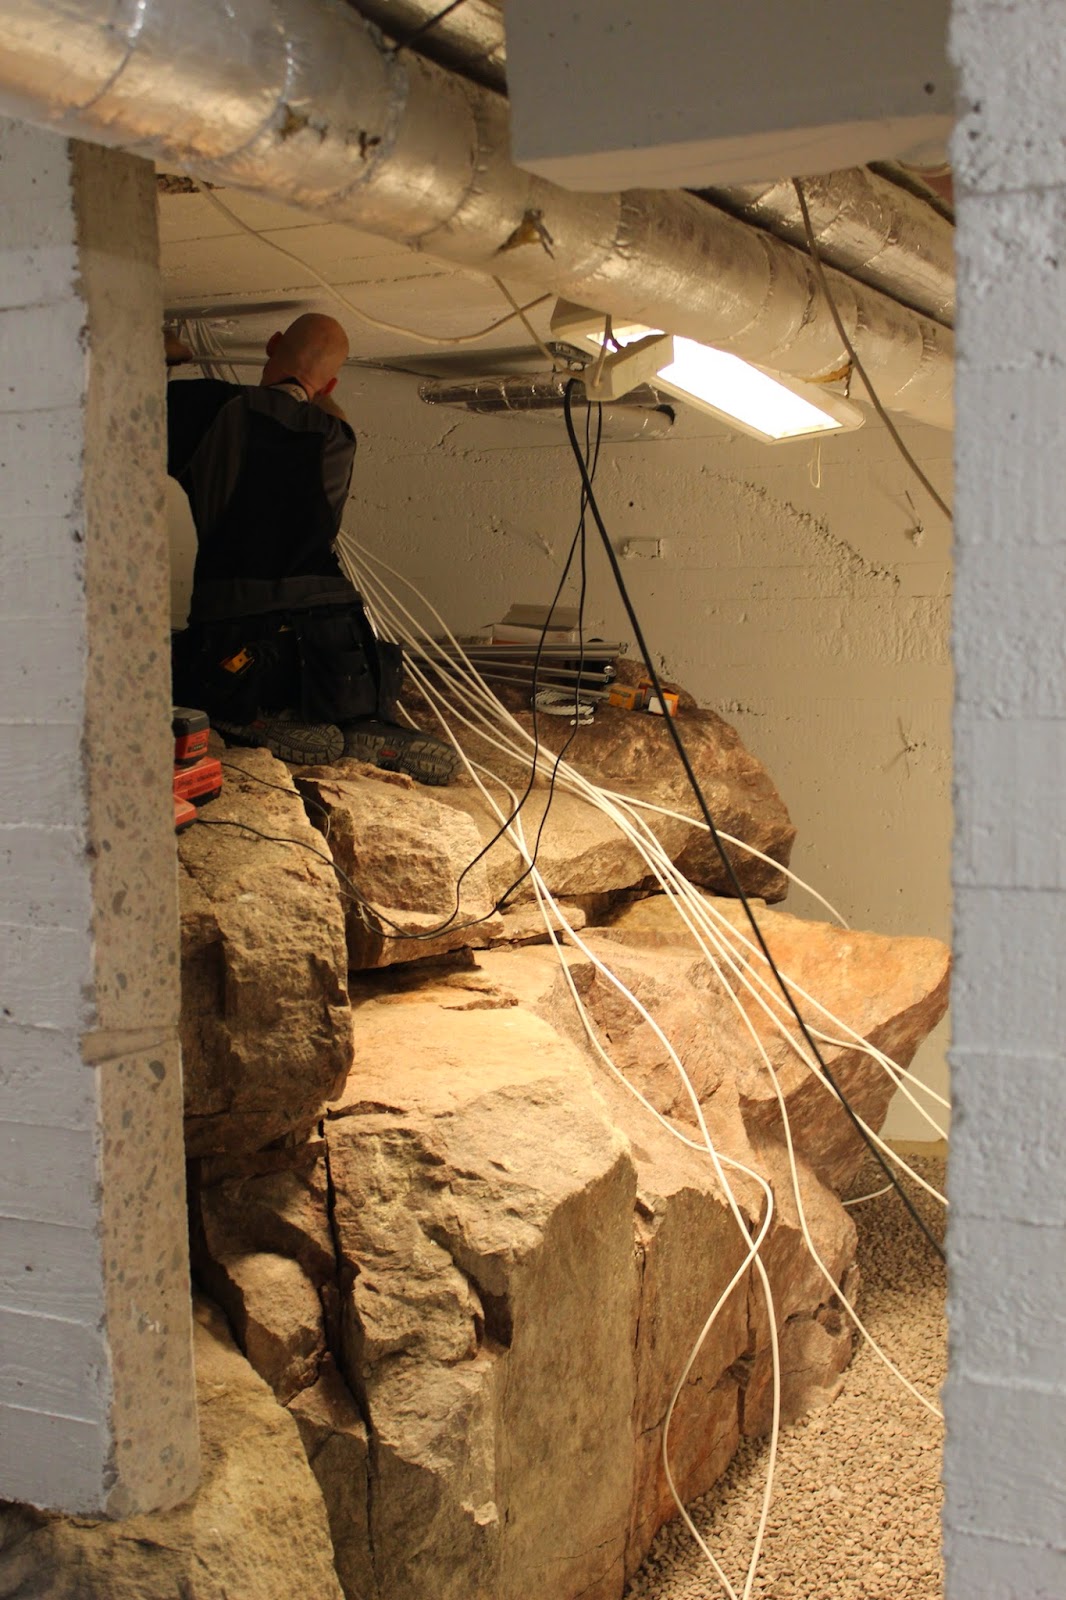
Eleven hours, hundreds of meters of cable, one electrician (Kaitsu) and his assistant (Pekka). The bunker is now electrified.

Projects which deal with electricity clearly fall into the anti-DIY category. Fortunately, our friend Kaitsu, who completed the electric work upstairs earlier, had promised to accept the downstairs (extreme) challenge as well.

Work in process


Half a storage space, half a Man Cave for Pekka's projects, lighting plays a crucial role. Light will be provided by a set of fluorescent tubes placed in various places around the bunker. For example, the tubes on the back wall (picture below) will be covered by a board in front to make the light indirect.


Indirect light to be


Major part of Pekka's assistant work was to drill the needed holes to enable running the cable from the electrical board located upstairs to downstairs. Once again, the recently acquired new drilling tool with a 30 mm drill bit become handy once again. Altogether, to run all the wires through required three rather big holes to connect the floors.


Way from upstairs


As it will be a Man Cave, there were certain "special" requirements. Perhaps the most manly one was the availability of power current. Pekka can finally cross this point "completed" from his long term wish list. The power current really marks the beginning of a new era in the Olive Green Window, enabling the use of a much wider variety of tools than before. Just imagine the possibilities! Nevertheless, we will start by compressing the gravel on the bunker floor by using a machine instead of manual effort, which would be clearly insufficient anyways.


Power current plug

As a summary, it is pretty amazing now there is power. Oh, and the floor heating in the downstairs lounge works as well. Quite nice indeed.


May 27, 2014

Painting lesson

We are making progress with the paintwork in the bunker. Today we also realised that for the first time the area is finally dust and tool free enough to allow Sofi to move around a bit more freely than before.

And what does she do when let loose? Of course, following Pekka's footsteps she wanted to paint.

Painter and his assistant

The little painter surprised us by really focusing on the task at hand. Usually, her attention span tends to be on the shorter end of a spectrum, but this novelty engaged her for quite a long while.

Learning all parts of the process

Afterwards, the discoveries continued. The joy of realising the possibilities provided by the large rock formation is a pretty good predictor for the attractiveness of the bunker during the years to come.

Checking out the tools

A few more nights, and the whole bunker will be painted. The white paint seems to be working wonders in many ways. The space does not only light up, but the fresh layer also makes the air feel fresher.


Nearly finished

And what's next? This coming Friday our trusted electrician Kaitsu will start working on the electrical cables, switches, plugs and lighting. After being "wired", there are still several steps before the bunker will be finished, for example a tiny detail such as the steel reinforced concrete floor. Anyway, the light in the end of the tunnel has started to take shape. We are so excited - when ready, the bunker will simply rock.

May 25, 2014

Fast forward

Again, another crazy week is ending.

Physically drained but mentally excited we finally had to admit it: the nesting instinct seems to lie exceptionally strong in us. Despite of the occasional fleeting moments of despair we'd choose to do all of it again in a minute. Crazy.

Lots of work has been done. Small steps, bigger steps. Perhaps not overly exciting steps, but steps forward nevertheless. The checklist from Friday night is as follow:

First, the downstairs walls have been painted with a base coat.

After base coat

Second, the floor heating cable has been covered and the tubes for sensors have been fitted in place.

Sensor tubing waiting to be covered


Third, 10 tons of gravel has arrived. And thanks, once again, to the invaluable help of Juha, Janne, Jouni and Matti, it has miraculously moved to the bunker. You guys rock!!

Pile of gravel

300 mm layer of gravel

Evened out


Last, the painting of the bunker walls and ceiling has been initiated.

The first corner


Fortunately, one of us had time to enjoy the sun outside, as it has been beautifully warm now in Finland. At the age of two, watering the herbs is quite exciting.


Little gardener