Pekka's parents have a stunningly beautiful Eames lounge chair by Vitra for Herman and Miller International. The chair dates back to late sixties / early seventies and was found by Pekka through eBay a few years ago. Since its discovery the chair has gone through extensive restoration. First, the brazilian rosewood panels were stripped from ugly, old lacquer layer. Then they were treaded with pure Tung oil. Last, some parts of the leather upholstery were replaced due to wear and tear. The end result: a perfectly functional piece. Well, almost.
When originally assessing the restoration needs, a decision was made not to change the shock mounts as their condition seemed ok. Considering the construction of these chairs, it is indeed the shock mounts or more precisely the adhesive joints that attach the shock mount to the plywood are the most delicate parts of the entire assembly.
Only a few months after Pekka's parents started using their chair a disaster struck totally out of thin air. Without any warning an adhesive joint of one of the shock mounts gave in while someone was sitting in the chair. When this happens the whole backrest assembly remains supported only from one side, resulting in the backrest swinging sideways. One can only pray and hope that the resulting damage will be fixable as the worst case scenario is that the load of the backrest will break the beautiful rosewood panel.
 |
| Torn plywood |
Only a few months after Pekka's parents started using their chair a disaster struck totally out of thin air. Without any warning an adhesive joint of one of the shock mounts gave in while someone was sitting in the chair. When this happens the whole backrest assembly remains supported only from one side, resulting in the backrest swinging sideways. One can only pray and hope that the resulting damage will be fixable as the worst case scenario is that the load of the backrest will break the beautiful rosewood panel.
Fortunately, the situation was not as bad as it could have been. Yes, the panel was torn, but only from inside and from a depth of four out of ten millimeters of plywood. The rosewood of the outside panel was nearly completely saved with only a minor crack.
Aware of the situation, Pekka packed his tools and materials when we took off to a family summer trip to visit his parents. It is of course very unfortunate that something like this happens, but the silver lining is that this indeed is a dream project for Pekka for the summer vacation!
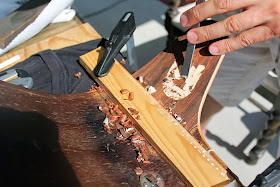
All four shock mounts were changed in the process, but let's focus on the one with the ripped panel. First thing to do is to get rid of all the ripped layers of plywood. This is important in order to achieve a solid foundation to build on.
 |
| Two shock mounts: one with an adhesive joint that gave up and the other with broken plywood |
All four shock mounts were changed in the process, but let's focus on the one with the ripped panel. First thing to do is to get rid of all the ripped layers of plywood. This is important in order to achieve a solid foundation to build on.
 |
| Getting rid of the bad parts |
In these kind of operations, one has to master the adequate skills and knowledge, but this is not enough. Also the materials for rebuilding have to be of premium quality. Luckily, we happen to be fortunate to have good connections. Therefore, we would like to thank Janne from HVL, who during his vacation made himself available to provide all the veneer that was needed for the project. Remember to contact him if ever in need of premium quality veneer!
 |
| Veneer including brazilian rosewood also know as the Rio Palisander |
After preparing the panel and cutting the veneer pieces everything was molded together. As Pekka didn't have the possibility to construct a mold he improvised with several vises. After a few beers needed to avoid dehydration, not bad at all.
 |
| Improvised plywood mold |
After opening the "mold" and cutting and sanding the sides of the veneer Pekka could finally evaluate the outcome of his work. The results at this stage seemed promising as the structure was solid. Yes, there is a visible difference in the texture between the old and new veneer, but this would not be a concern as it would be covered by the cushions.
 |
| Old and new: inside view |
 |
| View from the bottom |
Next Pekka needed to create the base for a shock mount. The important thing is the geometric purity of the base. As working with a chisel requires some serious skills, so please be honest with yourself and when in any doubt contact a professional. Otherwise you may very well sacrifice the whole structure.
 |
| Working with a chisel |
Again the end result for this phase looked good. The surface seemed flat enough so Pekka could proceed to the next stage.
 |
| Flat base |
Last but definitely not least the new shock mount was glued to the plywood. The shock mounts we use are genuine OEM (original equipment manufacturer) parts and received together with the glue from Graham Mancha from UK. He is definitely one of the most knowledgeable people when it comes to Eames chairs and deserves our sincerest gratitude. It is indeed due to his kind guidance that Pekka has managed gain most of his knowledge regarding these chairs. So please, do not hesitate to contact Graham if you have any questions or needs regarding vintage Eames chairs.
 |
| Glued shock mount |
The end result is more than we ever dared to expect. At the time of these pictures the glue had not been settled enough to assemble everything together, but everyone, including Pekka's parents are more than happy to show the result with in these few pictures to follow.
 |
| Panel interior |
 |
| Panel exterior |
We have been discussing about shock mounts before, but because of their importance let's do it one more time. Please understand that it is not IF, but rather WHEN that one of the shock mounts will give in. If you have an Eames Lounge chair and don't want to break your it please consider these simple instructions:
- While using the chair listen carefully if the chair makes any suspicious noises while leaning back
- Periodically check the condition of the adhesive joints of the shock mounts
- While standing behind the chair try to lift it up by the back rest to see if it is loose
- If something happens and you don't know how to fix it, please contact someone who does
- If you decide to fix the problem yourself make sure to have the required skills
- Use only premium quality materials, glues and original OEM parts
- DON'T BUY CHEAP SHOCK MOUNTS FROM EBAY as it is a guaranteed way to make the situation worse.
 |
| Chilling out |
And Urho? Well, during the last few days we have been lucky to enjoy great summer weather in Finland. The high temperature makes Urho even slower than he normally is and due to this he is forced to take a cold shower every day. Even if we know it is good for him, he just simply hates it.


